What gets indexed

You can configure the type of Salesforce object that is indexed, such as Account, Opportunity, or Case. Onyx creates one document for each record of that object. If you pick none, Onyx indexes Account. A document contains the record’s fields, plus the fields of the records directly related to it. So a document for an account also includes that account’s contacts, opportunities, cases, and notes.

What is not indexed

  • Files and attachments
  • Encrypted fields
  • Salesforce system objects, such as history, sharing, feed, and Chatter records
  • Record IDs and date fields
  • Records more than one step from the object you picked
  • Records the connector’s credentials cannot access

Before you begin

You need:
  • An Onyx administrator account.
  • A Salesforce edition with API access: Enterprise, Unlimited, Performance, or Developer editions.
    • Professional Edition needs the Web Services API add-on.
    • Group and Essentials editions cannot use the API and cannot set up the connector in Onyx.
  • A Salesforce user with the API Enabled permission who can see every record you want indexed. Onyx indexes as this user, so a read-only integration user works well.
Onyx signs in as that Salesforce user in one of two ways:

OAuth

Recommended for most users. Available on Onyx Cloud and self-hosted.

Username, password, and security token

Available on Onyx Cloud and self-hosted.

Authenticate with OAuth

OAuth uses your organization’s normal Salesforce sign-in, including SSO. You do not need a Salesforce password or security token.

Onyx Cloud

An administrator must install the Onyx Salesforce OAuth package before users can authorize Onyx.
1

Install the Onyx package

Install the Onyx Salesforce OAuth package in your Salesforce organization.For a Salesforce sandbox, use the sandbox installation page.
2

Set permitted users

In Salesforce Setup, open External Client App Manager and select Onyx Cloud. Open Policies and pick a permitted-user policy.Admin approved users are pre-authorized is the safer choice. Assign the app to the profiles or permission sets that need it. Pick All users may self-authorize only if your organization allows it.
3

Keep the packaged OAuth credentials

Do not generate local consumer credentials for Onyx Cloud. Local credentials disconnect the installed app from the OAuth configuration that Onyx manages.
Continue to Configure the connector in Onyx.

Self-hosted Onyx

If an administrator has already configured OAuth for your deployment, skip to Configure the connector in Onyx.
First, make sure your Onyx deployment has a public HTTPS address, because Salesforce rejects plain HTTP callback URLs. Then enable My Domain in Salesforce and sign in as an administrator.
1

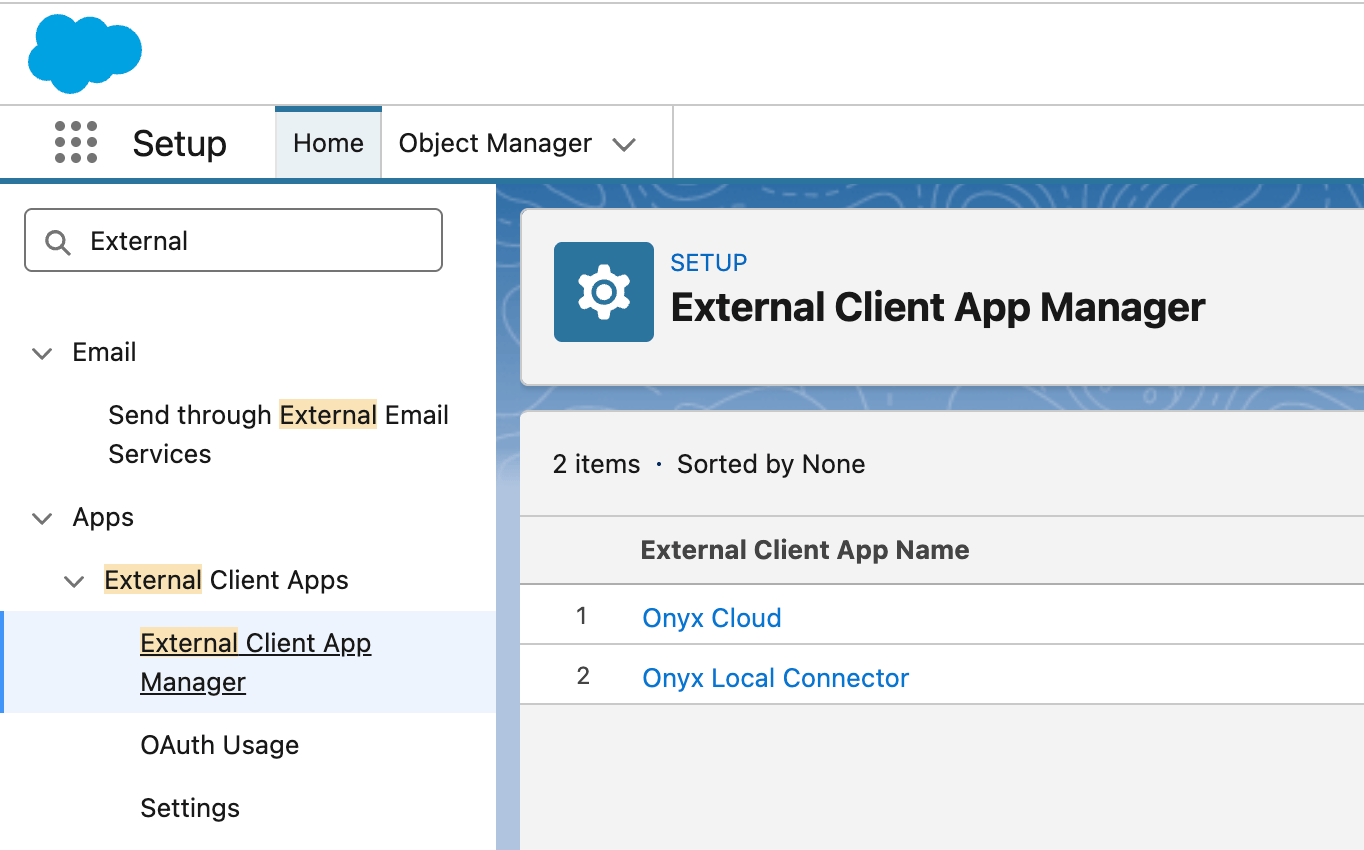
Create an External Client App

In Salesforce Setup, search for External in Quick Find, then open External Client Apps → External Client App Manager. Select New External Client App and set Distribution State to Local.External Client App Manager in Salesforce Setup, reached by searching for External in Quick Find
2

Configure OAuth

Turn on OAuth. Set the callback URL to your Onyx address followed by /connector/oauth/callback/salesforce:
The scheme, host, base path, and port must match your deployment exactly. If your Onyx address ever changes, update this callback URL to match, or OAuth stops working.
3

Add OAuth scopes

Add two scopes:
  • Manage user data via APIs (api)
  • Perform requests at any time (refresh_token)
4

Configure OAuth security

Turn on all four of these settings:
  • Require a secret for the web server flow
  • Require a secret for the refresh token flow
  • Require PKCE for supported authorization flows
  • Refresh token rotation
5

Save the app credentials

Save the app, then copy its Consumer Key and Consumer Secret. Store the secret somewhere safe.Salesforce takes a few minutes to activate a new app or a policy change.
6

Set permitted users

Open the app’s Policies tab and pick a permitted-user policy.Admin approved users are pre-authorized is the safer choice. Assign the app to the profiles or permission sets that need it. Pick All users may self-authorize only if your organization allows it.Whoever authorizes Onyx also needs access to the records you want indexed.
7

Configure Onyx

Add these two variables to your Onyx .env file, then restart Onyx. See Configuration for where that file lives in your deployment.
.env
Onyx hides the OAuth option if either variable is missing. If Connect with Salesforce does not appear when you create a credential, start here.

Authenticate with a security token

Skip to Configure the connector in Onyx if you are using OAuth.
Sign in to Salesforce as the user Onyx will index with, then:
1

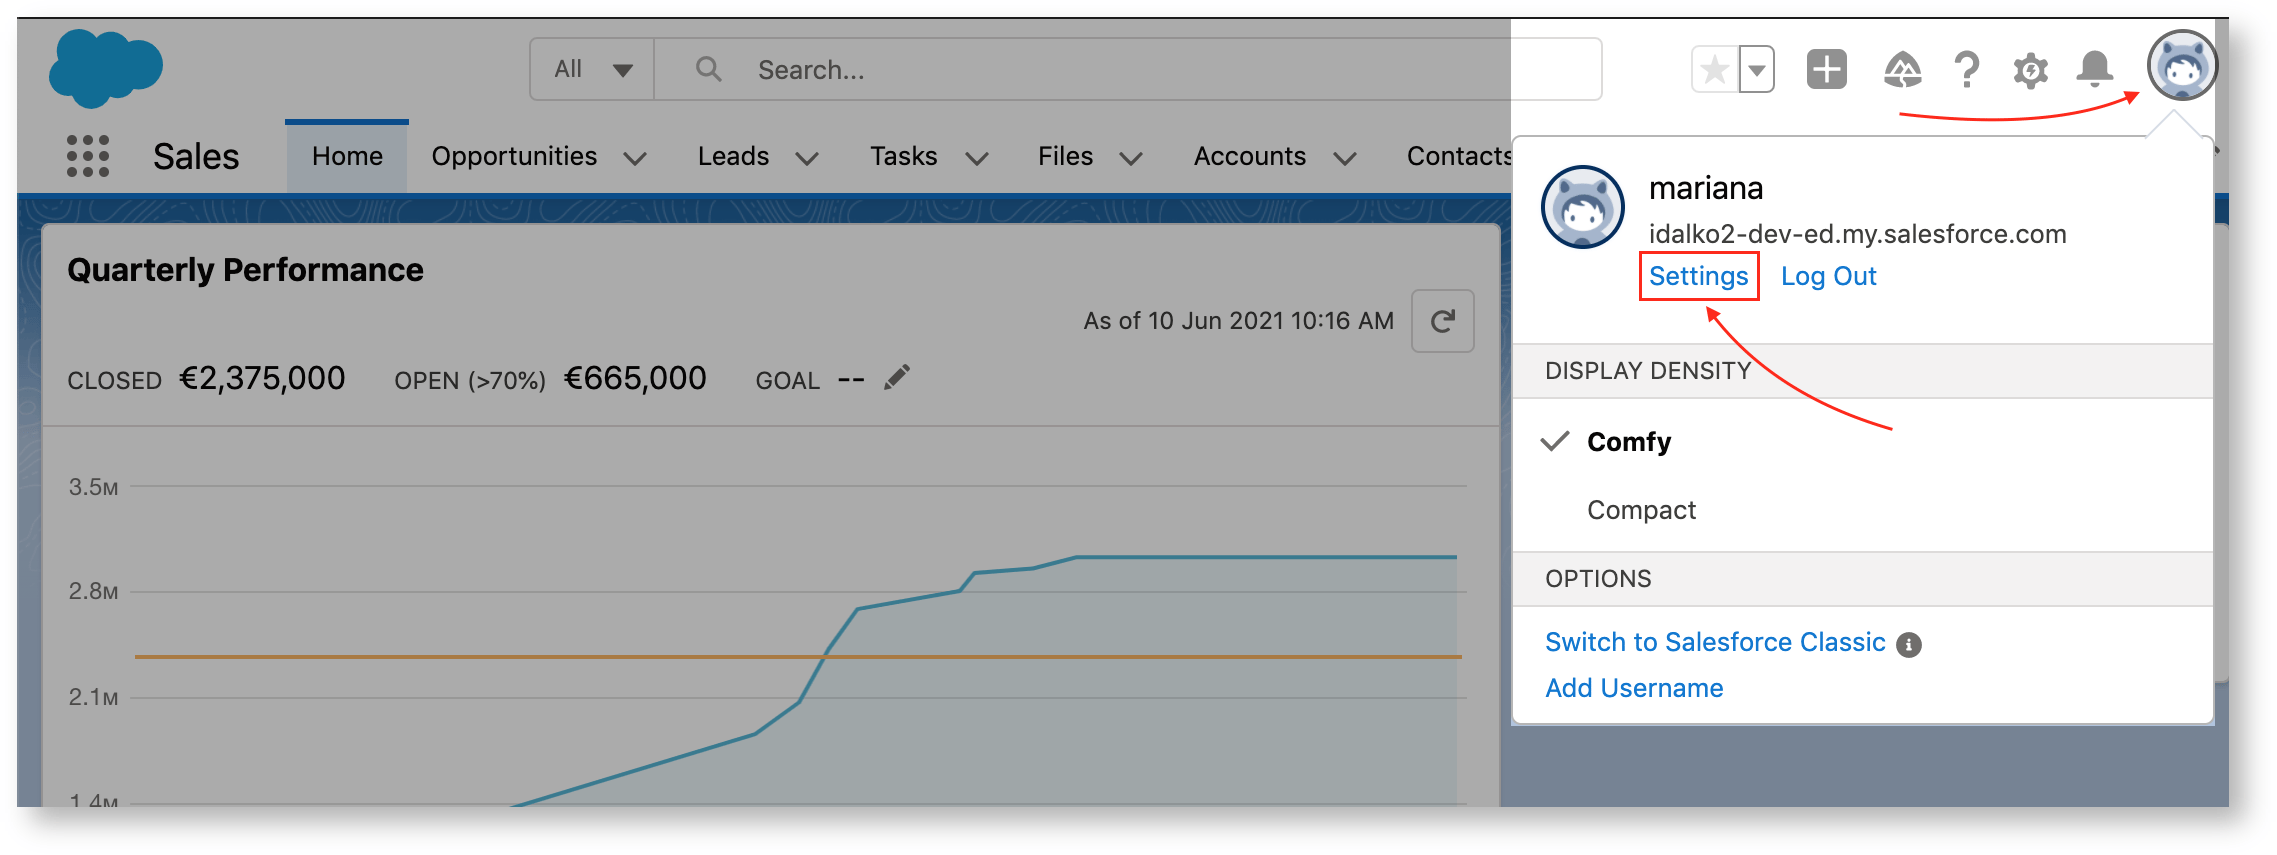
Open personal settings

Select your avatar, then Settings.The Salesforce avatar menu, with Settings highlighted
2

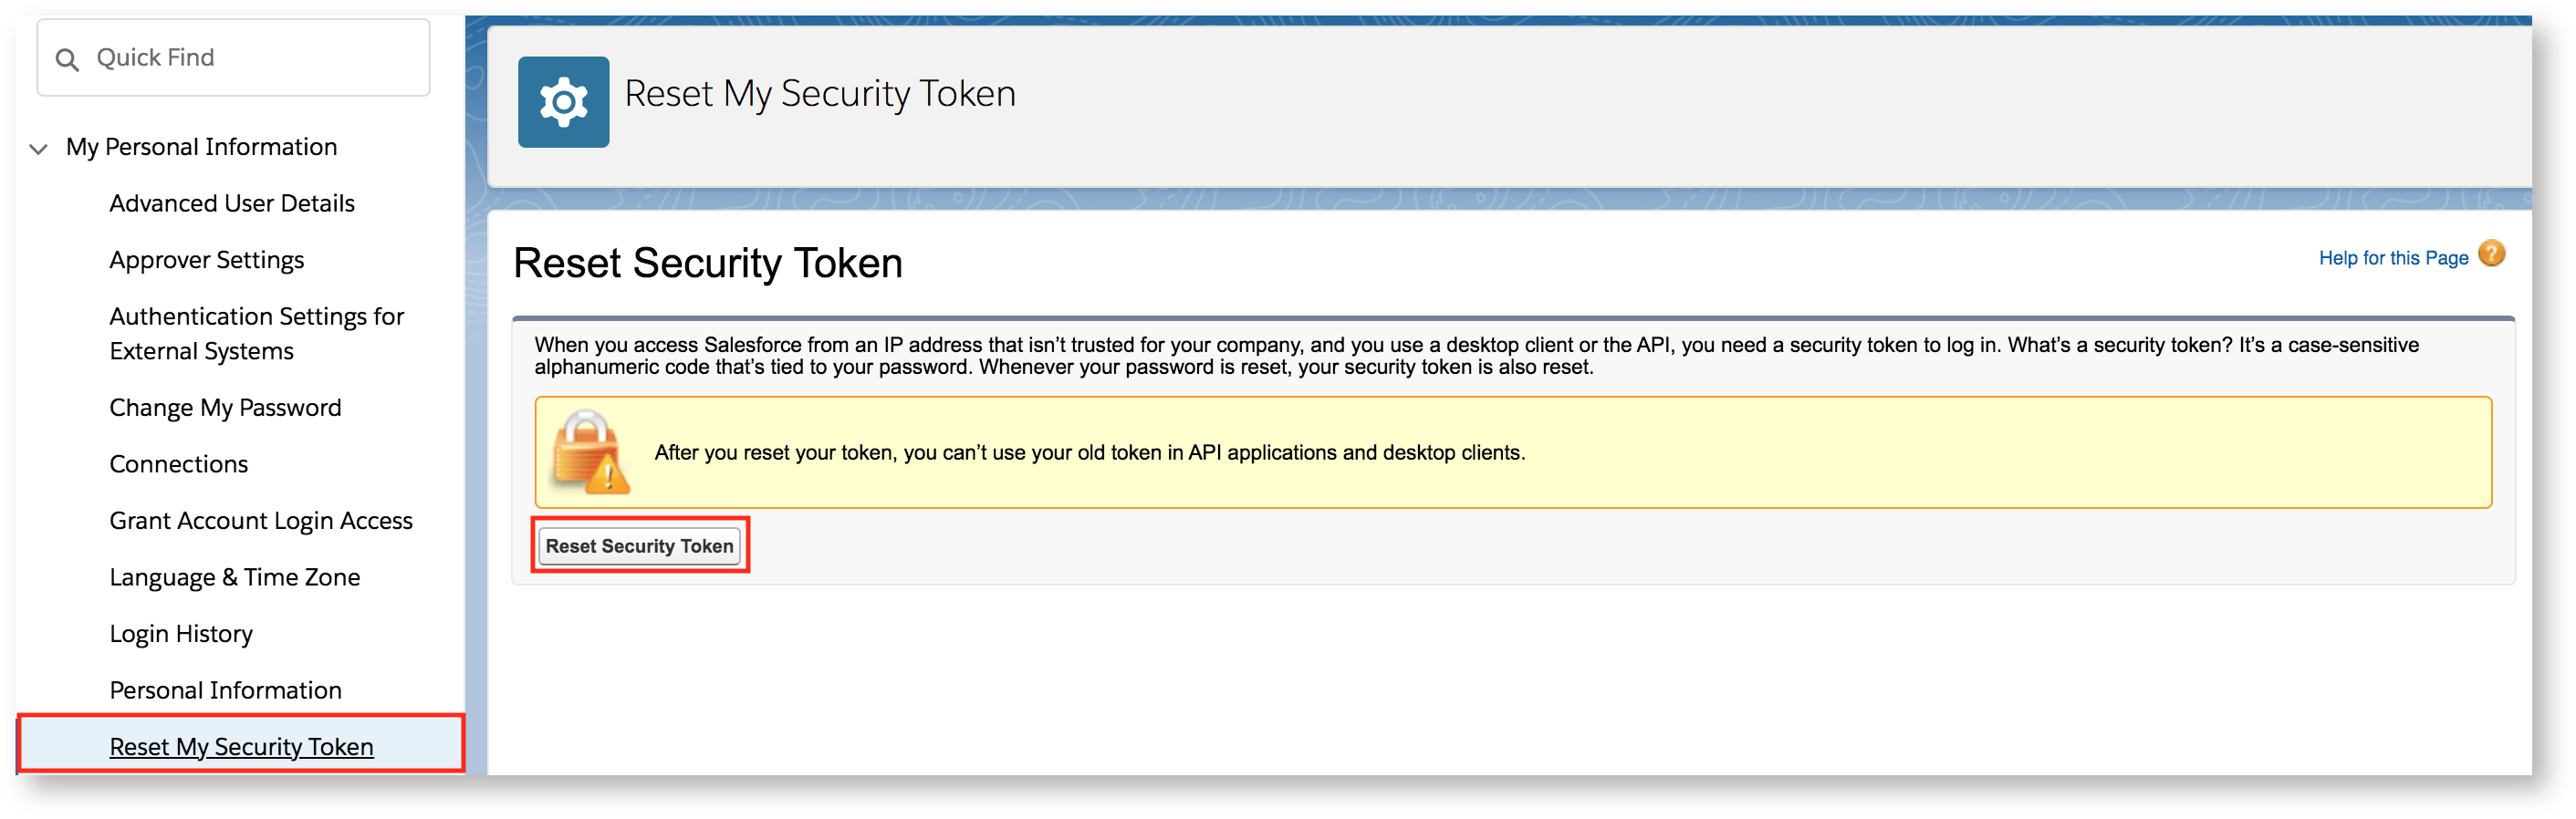
Reset the security token

Go to My Personal Information → Reset My Security Token and select Reset Security Token.The Reset My Security Token page in Salesforce personal settings
3

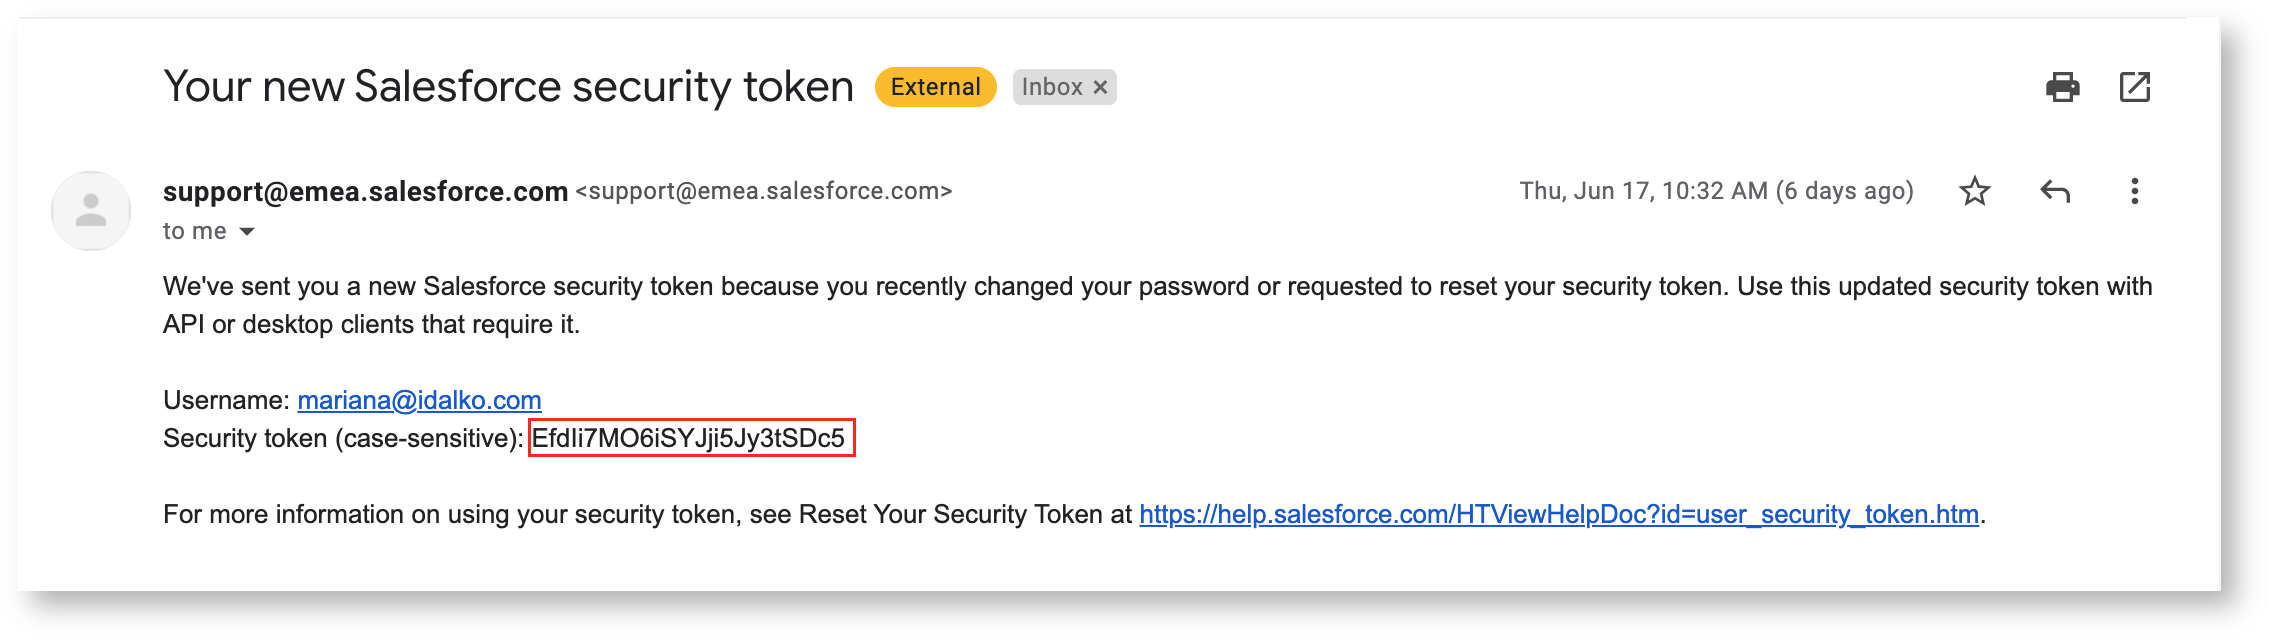
Get the token from your email

Salesforce emails the token to the address on the account. Salesforce never shows it again, so save it somewhere safe.A Salesforce email containing a new security token
Resetting the token invalidates the old one, which breaks anything else that signs in with it. Changing the account’s password also resets the token. Indexing stops until you update the credential in Onyx.

Configure the connector in Onyx

1

Open the Salesforce connector

In Onyx, go to Admin Panel → Add Connector and select Salesforce.
2

Create a credential

Select Create New, then choose one of:
  • Connect with Salesforce: Enter your My Domain root, such as https://company.my.salesforce.com. For a sandbox, use an address like https://company--dev.sandbox.my.salesforce.com. Then sign in to Salesforce.
  • Enter credentials manually: Enter the Username, Password, and Security Token. Turn on Is Sandbox Environment for a sandbox account.
For Connect with Salesforce, enter the root only. Onyx rejects login.salesforce.com, a path, a query, or a custom port.
3

Select the credential

Select the credential you just created and continue.
4

Choose the objects to index

Name the connector. Then list the objects you want under Simple, or describe them exactly under Advanced. See Choosing objects.
5

Choose the access type

Public shows every indexed record to all Onyx users. Private limits them to selected Onyx user groups. Auto Sync Permissions applies each searcher’s own Salesforce access. See Permission sync.See Document Access Controls for what each access type means.
6

Create and verify

Select Connect. Onyx checks the credential, then starts indexing.Open Admin Panel → Existing Connectors, select the connector, and check that the first indexing attempt finishes with about the number of documents you expect.

Choosing objects

Simple takes a list of object names. Advanced takes JSON that names the exact fields and related objects to index.
Use Advanced for finer control over what Onyx indexes.

Simple

List the Salesforce objects you want a document for, one per entry. Use each object’s singular API name, so Opportunity rather than Opportunities. Custom objects keep their __c suffix. Onyx then indexes every field on those records, and every field on the records related to them. On a large organization, that makes for long documents and a slow first index.

Advanced

Write a JSON object. Each top-level key names an object you want a document for, and takes two settings:
  • fields: the fields to index on that object
  • associations: the related objects to include, each with its own list of fields
Onyx matches names exactly, so use API names. Every object under associations must be a direct child of the object above it.
Example
This example creates one document for each account, with the listed fields from its contacts and opportunities. It also creates one document for each lead, with nothing attached.

Permission sync

Set the access type to Auto Sync Permissions, and an Onyx user sees only the Salesforce records they can read in Salesforce.
  • Onyx matches an Onyx user to a Salesforce user by email address. It checks the Salesforce username first, then the Salesforce email field, and it matches active users only. Someone with no match sees no Salesforce content.
  • A single result can come back partly redacted. If you can read an account but not one of its opportunities, Onyx strips out the opportunity and keeps the rest.
  • Users who are not signed in see no Salesforce content at all.
Permission sync is a paid feature: the Business and Enterprise tiers on Onyx Cloud, and the Enterprise Edition when self-hosted.

Troubleshooting

The username, password, or security token is wrong, or a password change reset the token. Reset the token and update the credential in Onyx. If all three are correct, check that the organization has API access and that the user has the API Enabled permission.
The user’s profile has Login IP Ranges set. That blocks logins from anywhere else, so Salesforce hides the token option. Clear the ranges, or move the user to a profile without them. Chatter External and Chatter Free users cannot reset a token either.
Check the object names. Use each object’s singular API name, and keep the __c suffix on custom objects. You also get no documents from an object the credential’s user cannot see.
An object under associations is not a direct child of the object above it, the two are the wrong way around, or the name is not the object’s API name.
The first index downloads every record of the objects you picked and everything related to them. Switch to Advanced and name only the objects and fields you need.
The organization has used its daily API allowance. Onyx retries, but the run finishes sooner if you narrow the connector or schedule it away from your other integrations.
On Onyx Cloud, confirm that an administrator installed the Onyx Salesforce OAuth package. If the package is installed and the option is still missing, contact Onyx Support.On a self-hosted deployment, SALESFORCE_CLIENT_ID and SALESFORCE_CLIENT_SECRET are missing. Set both, then restart the API server and every background worker.
Enter the HTTPS root of your My Domain and nothing else. Remove any path, query, fragment, or port.
Compare the External Client App’s callback with your Onyx address character by character. Check the scheme, host, base path, and port.
An authorization code works once and expires quickly, so start the sign-in again. If it still fails, check the app’s permitted-user policy, and check that the app is assigned to the profile or permission set of whoever is authorizing.
Their Onyx email matches no active Salesforce user, by either username or email address.